" Trust me it's very easy to Install "
- Fabric Sails - Seams and Hems face up. (Less mould build up and they dry out better facing up.) The underside is always the presentation side, which is another good reason for having the seams and hems facing up.
- Waterproof Sails - Laminated side, seams and hems face down. This protects the lamination.
- Attach Direct Fix (D Shackle) Points first.
- Open, lubricate then hang Turnbuckles off posts/fixing points. Use Graphite Anti Seize, Vaseline, Sewing Machine Oil, Axle Grease etc. Lubricating the Turnbuckles is most important as SST is brittle and will seize if you are not careful.
Ensure Turnbuckle has right turning end on the post/fixing point, not the Sail. Left hand end on the Sail. - Lubricate the corner fitting (D Ring) cable groove. This stops the cable from sticking as you tighten the Sail. A spray can of lubricant with a nozzle is the simple way to do this.
- Fix the sail to each fixing point using the starter cord (rope) attached.
Loop over post/fixing point, back to Sail 2 or 3 times to achieve leverage. - Get the sail into a satisfactory position then measure each gap.
- If necessary go to our Hardware page to order turnbuckles and/or cable trace.
- Then, attach and tighten the turnbuckles sequentially until you have a sufficient amount of tension on the Sail. Look to see the Fabric pulled tight and the cable pulled tight.If your fixing points are strong, you can put plenty of tension on the Sail. Use your judgement. The tighter the Sail, the better it will handle the storms.
DIY Standard Shape Shade Sail Installation Guide
Turnbuckles, Cable Trace and D Shackles, all available on our shade sail hardware page, may be required for your new Standard Shape DIY Shade Sail Installation. Any purchase of a Standard Shape Shade Sail does not include fittings.
With our “Standard Size” DIY shade sails Installations, you can achieve a great result. Keep in mind that the sail will stretch by around 10%.
The correct length of the SST cable has been calculated and is now swaged off in the perimeter of your shade sail. To completely tighten the SST cable, stretch the sail out using turnbuckles or UV resistant cord.
If you do the following steps correctly, you'll have a well-tensioned Shade Sail Installation that looks like it was placed by experienced Shade Sail installers.
- The first step is to lay out the sail on the ground where your fixing points will be installed.
- Each fixing point should be at least 400mm - 600mm outside the sail's edge.
- Turnbuckles or a cable trace can easily fill up the gap.
- It is much better to leave more room rather than less.
- Using the rope attached to each corner, attach the sail to each fixing point.
- Then adjust the tension so that the sail fits as well as possible.
- Measure and record each gap giving you the size turnbuckle or cable trace necessary.
- If you need us to supply turnbuckles and cable trace, you can order on our Hardware page.
- The below diagrams illustrate the critical necessity of BISECTING EACH CORNER.
- If you follow our instructions, you'll end up with a professional look for a fraction of the cost of having a Shade Sail Company supply and install it.
- As you're dealing with a specific sail size, you'll need to match your posts, fixing points and other details to the sail precisely.
- We recommend a minimum of 75mm x 75mm x 3mm wall steel posts.
- For taller sails up to 2.8m – 4m above ground, 100mm x 100mm x 4mm is preferable.
- This is the most common post size among professionals and it is well worth the extra cost.
- The footings should be 1000mm x 350mm and the concrete should have a minimum strength of 20MPA. It's best to go overboard on the strength because a storm will undoubtedly put your efforts to the test.
- Square your post on all sides, but lean it back about 5 to 7 degrees, as is industry standard.
- We can provide the 316-grade stainless steel eye-nut assembly. (See the Hardware page for more information) We usually use 10mm eye nuts. You can use the shade sail specialists' approach by drilling 1 hole 50mm from the top of the post, bolting on the fitting and finishing with a post cap.
- There is a range of fittings to suit your purpose, whether you're fixing to masonry, brick or block, timber or another material.
- Individual scenarios, we've always found, can require a practical solution.
- Over the years, we've been continually astounded by the inventive solutions devised by our DIY consumers.
- You, too, can create a unique and attractive shade sail installation at very little cost, while also getting the satisfaction of building it yourself.
- We will provide a free consultation after your purchase to further assist you in getting a spectacular result.
NB: If the Shade Cloth catches on something, such as a box gutter corner, it can tear. Therefore all necessary precautions must be taken.
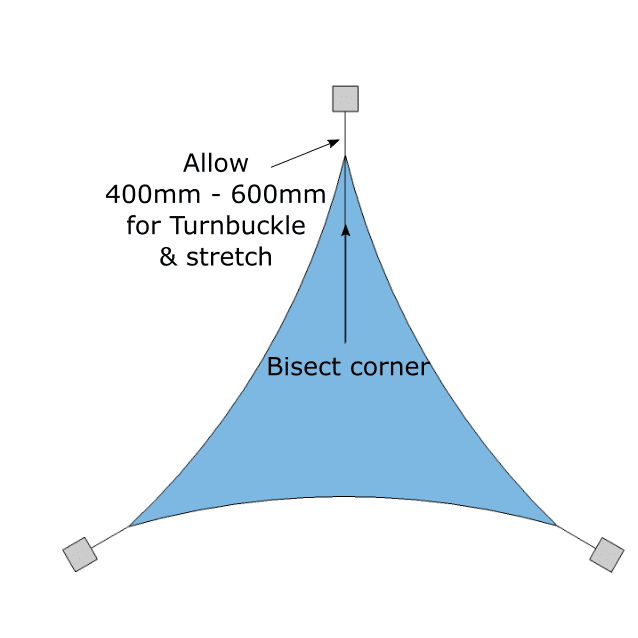
Equilateral Triangle: 3 Point
Standard Shade Sail: 3 Point
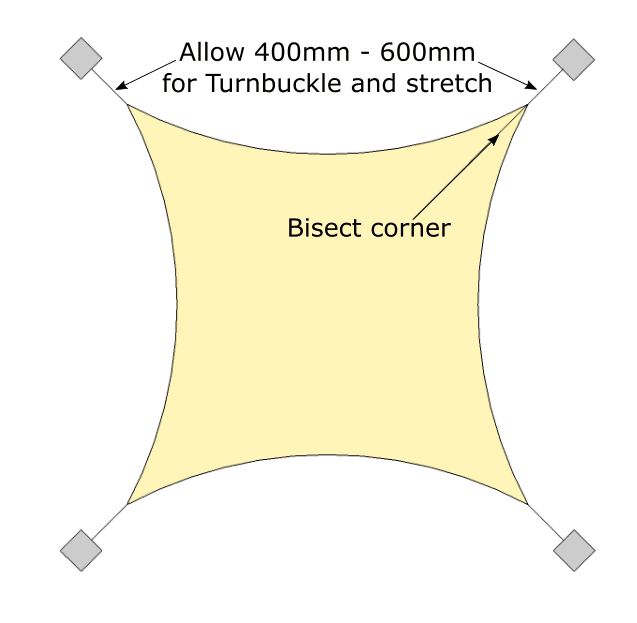
Standard Shade Sail: 4 point
Installation Guide for Standard Shade Sail: 4 point